Scaling Microservices with Docker Compose, Interlock, and HAProxy/NGINX

Back in the days, we had a monolithic application running on a heavy VM. We knew everything about it, where it was running, its IP address , which TCP/UDP port was it listening to, its status and health…etc. When we wanted to find that app, we knew where to find it. We even gave it a static IP address and advertised its DNS name for other apps to refer to it. But things have changed, and the the monolith is now a bunch of microservices running in Docker containers.

The new microservices architecture has quite the advantages: flexibility, portability, agility, and scalability to name a few. But it also introduces some challenges ( especially for the operations teams used to the monolithic approach). One of which is stochasticity. There is a notion of randomness/chaos when deploying microservices(especially on a cluster of nodes e.g Swarm) as some attributes that were well-defined in the old days become unknown or hard to find with the new architecture.

In this article, I will describe how the challenge of microservices stochasticity can be addressed with a service-discovery service called Interlock. I will also describe how to scale these microservices by combining Interlock with Docker Compose and an HAProxy/NGINX service.

Let’s start with a simple app composed of two microservices : web (Python) and db(Mongo). Each of these microservices does one and only one thing. The web microservice receives http requests and responds to them. The db microservice saves data persistently and provides it upon the web microservice’s request. These two microservices are described in a docker-compose.yml file. If you’re not familiar with Docker Compose, please visit this site to learn more.


# Mongo DB
db:
 image: mongo
 expose:
 - 27017
 command: --smallfiles
# Python App
web:
 build: . 
 ports:
 - "5000:5000" 
 links:
 - db:db

By installing Docker Compose and running this docker-compose.yml file, we can run this app on a single Docker engine or on a Docker Swarm cluster. In this example, I will be running this app on a Swarm cluster. Docker Compose will take care of building/pulling the images and spinning the two containers on one of the Swarm nodes. Note: since these two services are linked, Swarm will ensure they get placed on the same node.


dockchat#docker-compose up -d
Recreating dockchat_db_1...
Recreating dockchat_web_1...

dockchat#docker-compose ps
 Name Command State Ports
--------------------------------------------------
dockchat_db_1 /entrypoint.sh --smallfiles Up 27017/tcp
dockchat_web_1 python webapp.py Up 10.0.0.80:32829->5000/tcp

Now let’s use the awesome “scale” feature that Docker Compose has. This feature creates new containers from the same service description. In this case, let’s try to scale our web service to 5.


#docker-compose scale web=5
Creating dockchat_web_2...
Creating dockchat_web_3...
Creating dockchat_web_4...
Creating dockchat_web_5...
Starting dockchat_web_2...
Starting dockchat_web_3...
Starting dockchat_web_4...
Starting dockchat_web_5...

#docker-compose ps
 Name Command State Ports
---------------------------------------------------------------
dockchat_db_1 /entrypoint.sh --smallfiles Up 27017/tcp
dockchat_web_1 python webapp.py Up 10.0.0.80:32829->5000/tcp
dockchat_web_2 python webapp.py Up 10.0.0.80:32830->5000/tcp
dockchat_web_3 python webapp.py Up 10.0.0.80:32831->5000/tcp
dockchat_web_4 python webapp.py Up 10.0.0.80:32832->5000/tcp
dockchat_web_5 python webapp.py Up 10.0.0.80:32833->5000/tcp

Looks good so far! The app is up on one of the Swarm nodes, but how can we access it ? Which node/IP is it running on ? What happens if we re-deploy this app ? Are all the web containers being utilized ?

All of these are valid questions, and they highlight the challenge of stochasticity that I described earlier. There needs to be a better way to access these microservices without the need to do any manual search for their deployment attributes such as IP, port, node, and so on. We need a dynamic , event-driven system to discover these services and register their attributes for other services to use, and that’s exactly what Interlock does.

Interlock is a service that detects new microservice containers when they come up/go down and register/removes them from with other services that need to know about these new services. An example would be a load-balancing service such as HAProxy or NGINX. Interlock supports both NGINX and HAProxy. But anyone can write new plugin for their preferred service.

Let’s pick from where we left off, and see how Interlock can solve this problem. In this example, I’m using the HAProxy plugin( you can easily substitute in NGINX instead). I added a new service in the docker-compose.yml file called ‘interlock’ with the following parameters:


# Interlock/HAProxy
interlock:
 image: ehazlett/interlock:latest
 ports:
 - "80:80"
 volumes:
 - /var/lib/docker:/etc/docker
 command: "--swarm-url tcp://<SWARM_MASTER_IP>:3375 --debug --plugin haproxy start"
# DB
db:
 image: mongo
 expose:
 - 27017
 command: --smallfiles
# Web
web:
 build: .
 environment:
 - INTERLOCK_DATA={"hostname":"demo","domain":"interlock.com"}
 ports:
 - "5000"
 links:
 - db:db

Main thing to note here is that Inerlock is launched like any other service in a container. I also needed to add INERLOCK_DATA as an env var in web service container. INTERLOCK_DATA will tell Interlock how to register this new service.

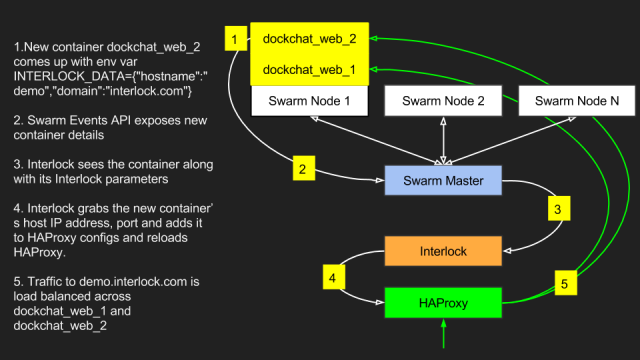
One of the great features of Docker is the Events API. From the Docker Client, ‘docker events’ will show all events happening with the specific Docker Engine or Docker Swarm cluster. Many projects out there today utilize the events API for container operations’ visibility and monitoring. Similarly, Interlock uses the events API to discover when containers come up or go down. It then gets some attributes about the containers such as service name, hostname, host IP and port. This info is then used to create new config for HAProxy/NGINX. The following diagram and log outputs show how Interlock works:

Interlock Visual (2)


dockchat-interlock# docker-compose up -d
Creating dockchatinterlock_db_1...
Creating dockchatinterlock_web_1...
Creating dockchatinterlock_interlock_1...

dockchat-interlock# docker-compose scale web=2
Creating dockchatinterlock_web_2...
Starting dockchatinterlock_web_2...

#docker logs dockchatinterlock_interlock_1
time="2015-09-19T20:44:32Z" level="debug" msg="[interlock] event: date=1442695472 type=create image=dockchatinterlock_web node:ip-10-0-0-80 container=dab9acc32f274710e0a2dc17d2546f1735993cd1b9b1e5354bd7e1a9a27ce83a"
time="2015-09-19T20:44:32Z" level="info" msg="[interlock] dispatching event to plugin: name=haproxy version=0.1"
time="2015-09-19T20:44:32Z" level="debug" msg="[interlock] event: date=1442695472 type=start image=dockchatinterlock_web node:ip-10-0-0-80 container=dab9acc32f274710e0a2dc17d2546f1735993cd1b9b1e5354bd7e1a9a27ce83a"
time="2015-09-19T20:44:32Z" level="info" msg="[interlock] dispatching event to plugin: name=haproxy version=0.1"
time="2015-09-19T20:44:32Z" level="debug" msg="[haproxy] update request received"
time="2015-09-19T20:44:32Z" level="debug" msg="[haproxy] generating proxy config"
time="2015-09-19T20:44:32Z" level="info" msg="[haproxy] demo.interlock.com: upstream=10.0.0.80:32840 container=dockchatinterlock_web_2"
time="2015-09-19T20:44:32Z" level="info" msg="[haproxy] demo.interlock.com: upstream=10.0.0.80:32839 container=dockchatinterlock_web_1"
time="2015-09-19T20:44:32Z" level="debug" msg="[haproxy] adding host name=demo_interlock_com domain=demo.interlock.com"
time="2015-09-19T20:44:32Z" level="debug" msg="[haproxy] jobs: 0"
time="2015-09-19T20:44:32Z" level="debug" msg="[haproxy] reload triggered"
time="2015-09-19T20:44:32Z" level="info" msg="[haproxy] proxy reloaded and ready"

We can see that when we scaled the web app, Interlock detected the new services and registered them in HAProxy. To verify which services belong to demo.interlock.com,  we can look at HAProxy stats page (demo.interlock.com/haproxy?stats). Another point to note here is that a single Interlock service can register multiple sites automatically. The moment a new container comes up with a different INTERLOCK_DATA hostname data, Interlock will add the new config in HAProxy. Pretty neat!

Screen Shot 2015-09-19 at 1.58.06 PM

Finally, we can see from the stats page and from the web service itself that traffic hitting demo.interlock.com was load-balanced across these new containers as can be seen here:

Screen Shot 2015-09-19 at 1.51.55 PM

Note: to access the site from you browser, make sure you add an /etc/hosts entry for demo.interlock.com with Interlock container’s host IP address.

Conclusion: In this article, I went over the challenge of stochasticity when deploying microservice containers on a cluster of nodes. I described how Interlock can be used to address this challenge by dynamically discovering these services and registering them with other services like HAProxy. Finally, I demonstrated how combining Interlock with an HAProxy can ease scaling your applications on a Swarm cluster.

Source repo can be found here.

Special thanks to Evan Hazlett for creating Interlock.

Securing Docker with TLS

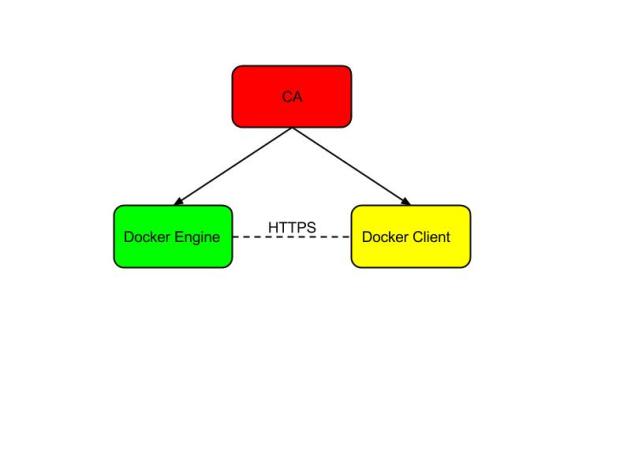
By default, Docker engine listens to a non-networked Unix socket ( /var/run/docker.sock ). In order for the Docker client or any other HTTP client to communicate securely with the Docker Engine REST API, a TLS hand-shake must occur. This tutorial will go over the process of generating TLS certificates, distributing them to Docker engines and clients, and successfully establishing HTTPS connection between a Docker client and engine.

Note: If you are not familiar with Certificate Authority(CA) and SSL/TLS certificates, here is a good reference that explains them.

TLS and Docker v0.0

Setup: I have three EC2 instances simulating a common scenario as follows:

  • ca: A host acting as a CA that will generate certificates and keys for my Docker Engine host and Docker Client host.
  • engine: A host running Docker engine.
  • client: A host acting as a Docker client.

Note: You don’t need three hosts to go through this tutorial, as you can have the CA, engine Docker and client all be on the same host.
Step 1: Generate Root and Intermediate Certificates and Keys:

In this tutorial, we will generate our own certificates, which means that we would need to create both a root and intermediate certificates. Generating these certificates manually is hedious, so I used Richard Crowley’s awesome Certified tool found here. You would need to follow the instructions of the repo to install the tool on your CA host.

Verify that certified and certified-ca were successfully installed:

nkabar@ca:~$ which certified

/usr/bin/certified

nkabar@ca:~$ which certifiedca

/usr/bin/certifiedca

Now that certified is installed, we can generate the intermediate and root certificates:

certifiedca C=“US” ST=“CA” L=“San Francisco” O=“Docker” CN=“Docker CA”

You should see a new directory ( ./etc/ssl ) with the generated certificates(/certs/) and keys(/private):

nkabar@ca:~/etc$ tree

.

└── ssl

   ├── ca.cnf

   ├── ca.csr

   ├── certs

      ├── ca.crt                    # Intermediate Certificate

      └── rootca.crt               # Root Certificate

   ├── defaults.sh

   ├── private

      ├── ca.key                    

      └── rootca.key

   ├── rootca.db

   ├── rootca.db.attr

   ├── rootca.db.attr.old

   ├── rootca.db.old

   ├── rootca.db.serial

   └── rootca.db.serial.old
3 directories, 13 files

Step 2: Generate Server and Client Certificates and Keys:

In this step we will use certified to generate server and client certificates and keys. In my setup, “server” certificate will be pushed to the host running Docker Engine, while “client” certificate will be pushed to the host running Docker Client ( Note: When you install Docker, both the Engine and the Client are installed, and the Engine starts automatically. I intentionally stopped it on the Client host to simulate connecting to a remote Engine). Server certificates provide encryption and security functionality while client certificates provide user/client authentication functionality. The client certificate identifies the user, while the server certificate identifies the server. Server certificate are generated for a specific server identity ( could be a single or multiple DNS names or IP addresses). In this tutorial, I will generate the server certificate using the EC2 public DNS name. More examples on how you can generate server certificates can be found in certified’s README.md file.

Note: it is very important to ensure that you set the CN (Common Name) to be the exact DNS name/IP of your server. For the client certificate, you can use an arbitrary name.

Server Certificate and Key Generation:

nkabar@ca:~$ sudo certified CN=“ec2-************.compute.amazonaws.com”

[sudo] password for nkabar:

certifiedcsr: configuring OpenSSL

certifiedcsr: generating RSA private key

Generating RSA private key, 2048 bit long modulus

………………………………………………………………….+++

……………………………………………………………….+++

e is 65537 (0x10001)

certifiedcsr: generating certificate signing request

certifiedcrt: signing the certificate

Using configuration from ec2-************.uswest-*.compute.amazonaws.com.cnf

Check that the request matches the signature

Signature ok

The Subject‘s Distinguished Name is as follows

countryName           :PRINTABLE:‘US’

stateOrProvinceName   :PRINTABLE:‘CA’

localityName          :PRINTABLE:‘San Francisco’

organizationName      :PRINTABLE:‘Docker’

commonName            :PRINTABLE:‘ec2-*************.compute.amazonaws.com’

Certificate is to be certified until Aug  8 00:22:29 2016 GMT (365 days)
Write out database with 1 new entries

Data Base Updated

Client Certificate and Key Generation:

nkabar@ca:~$ sudo certified CN=“docker_client”

certifiedcsr: configuring OpenSSL

certifiedcsr: generating RSA private key

Generating RSA private key, 2048 bit long modulus

……….+++

………..+++

e is 65537 (0x10001)

certifiedcsr: generating certificate signing request

certifiedcrt: signing the certificate

Using configuration from docker_client.cnf

Check that the request matches the signature

Signature ok

The Subject‘s Distinguished Name is as follows

countryName           :PRINTABLE:‘US’

stateOrProvinceName   :PRINTABLE:‘CA’

localityName          :PRINTABLE:‘San Francisco’

organizationName      :PRINTABLE:‘Docker’

commonName            :T61STRING:‘docker_client’

Certificate is to be certified until Aug  8 00:28:03 2016 GMT (365 days)
Write out database with 1 new entries

Data Base Updated

We can see that certified created the server and client certificates and keys:

nkabar@ca:~$ tree
   └── ssl        ├── ca.cnf

       ├── ca.csr

       ├── ca.db

       ├── ca.db.attr

       ├── ca.db.attr.old

       ├── ca.db.old

       ├── ca.db.serial

       ├── ca.db.serial.old

       ├── certs

          ├── ca.crt                                      # Intermediate Certificate

          ├── docker_client.crt                 # Client Certificate

          ├── ec2-*************.compute.amazonaws.com.crt # Server Certificate

          └── rootca.crt                                 # Root Certificate

       ├── defaults.sh

       ├── docker_client.cnf

       ├── docker_client.csr

       ├── ec2-*************.compute.amazonaws.com.cnf

       ├── ec2-*************.compute.amazonaws.com.csr

       ├── private

          ├── ca.key

          ├── docker_client.key                           # Client Key

          ├── ec2-*************.compute.amazonaws.com.key # Server Key

          └── rootca.key

       ├── rootca.db

       ├── rootca.db.attr

       ├── rootca.db.attr.old

       ├── rootca.db.old

       ├── rootca.db.serial

       └── rootca.db.serial.old
4 directories, 28 files

Step 3: Create Concatenated Intermediate+Server Certs:

In order for Docker to verify TLS certificates, the certificate needs to be concatenated: basically, we combine the Intermediate Certificate ( ca.crt ) and the Server/Client certificate ( ec2-*************.compute.amazonaws.com.crt / docker_client.crt) into a single certificate, as follows:

nkabar@ca:~/etc/ssl/certs$ sudo cat ec2-*************.compute.amazonaws.com.crt ca.crt > servercert.pem

nkabar@ca:~/etc/ssl/certs$ sudo cat docker_client.crt ca.crt > clientcert.pem

Step 4: Distribute Certificates and Keys:

Docker two-way authentication ( other authentication modes are explained here) requires the Server to have two certificates( Intermediate and Server Certificate)  and a private key. It also requires the Client to have two certificates( Intermediate and Client Certificate)  and a private key.

Note : To distinguish between the certificates, I re-named the required certificates and private keys then I tar’d them and distributed them to their respective hosts. e.g:

nkabar@ca:~/etc/ssl/certs$ sudo mv ca.crt ca.pem

nkabar@ca:~/etc/ssl/private$ sudo mv ec2-*************.compute.amazonaws.com.key serverkey.pem

nkabar@ca:~/etc/ssl/private$ sudo mv docker_client.key clientkey.pem

TLS and Docker v0.0

Step 5: Enable Docker TLS Verification:

Now that the certificates and keys are pushed to the Docker Engine/Client hosts, we can enable Docker TLS verification. To do so , we need to do the following steps:

a. Stop the Docker daemon

nkabar@engine:~$ sudo service docker stop

docker stop/waiting

b. Configure Docker Engine to use the server certificate and key

nkabar@engine:~$ sudo nano /etc/default/docker

# Need to add the following DOCKER_OPTS startup options:

# Use DOCKER_OPTS to modify the daemon startup options

DOCKER_OPTS=” –tlsverify –tlscacert=/path/to/certs/ca.pem –tlscert=/path/to/certs/server-cert.pem –tlskey=/path/to/certs/server-key.pem -H=0.0.0.0:2376 -H=unix:///var/run/docker.sock “

# These options make the Docker engine enforce TLS verifications based on the provided # certificates. It also makes the engine listen to both TCP port 2376 as well as the default # unix socket (this will allow local Docker client and engine to connect seamlessly using a # unix socket).

c.Start the Docker Engine:

nkabar@engine:~$ sudo service docker start

docker start/running, process 30885

nkabar@engine:~$ ps aux | grep docker         #Confirming that Engine is running

root     30885  8.0  1.7 157552 10748 ?        Ssl  01:33   0:00 /usr/bin/docker d tlsverify tlscacert=/home/nkabar/dockercerts/ca.pem tlscert=/home/nkabar/dockercerts/servercert.pem tlskey=/home/nkabar/dockercerts/serverkey.pem H=0.0.0.0:2376 H=unix:///var/run/docker.sock

d. On the Docker client host, test connecting to Docker engine:

Note: Make sure you connect using exact server DNS name used when generating server certificate.

nkabar@client:~$ docker tlsverify tlscacert=/path/to/ca.pem tlscert=/path/to/clientcert.pem tlskey=/path/to/clientkey.pem H=ec2-*************.compute.amazonaws.com:2376  version

Client version: 1.7.1

Client API version: 1.19

Go version (client): go1.4.2

Git commit (client): 786b29d

OS/Arch (client): linux/amd64

Server version: 1.7.1

Server API version: 1.19

Go version (server): go1.4.2

Git commit (server): 786b29d

OS/Arch (server): linux/amd64

Note: Alternatively, if you would like to secure Docker client by default ( without adding TLS and host info every time you make a call to the Engine), ensure that the intermediate certificate,client certificate,and client key are named ca.pem,cert.pem, and key.pem( respectively) and export the following environment variables:

export DOCKER_HOST=tcp://ec2-*************.compute.amazonaws.com:2376

export DOCKER_TLS_VERIFY=1

export DOCKER_CERT_PATH=/path/to/certificates    # {ca,cert,key}.pem directory

nkabar@client:~$ docker info                             # Uses environment variables

Containers: 0

Images: 0

Storage Driver: aufs

Root Dir: /var/lib/docker/aufs

Backing Filesystem: extfs

Dirs: 0

Dirperm1 Supported: false

Execution Driver: native0.2

Logging Driver: jsonfile

Kernel Version: 3.13.044generic

Operating System: Ubuntu 14.04.1 LTS

CPUs: 1

Total Memory: 588.6 MiB

Name: engine

ID: 3V5X:AWNE:OB7Q:NXC3:BWBO:KN4R:ZDTZ:DM3L:VBY3:WSCS:5SFJ:6IUM

WARNING: No swap limit support
nkabar@client:~$ service docker status                  # No Docker Engine running locally

docker stop/waiting

Summary:

In this tutorial, we went through generating TLS certificates and keys using certified, distributed them to a Docker client and engine hosts, and successfully established a secured HTTPS connection between the Docker engine and client. For more info on Docker HTTPS Security please go to https://docs.docker.com/articles/https/.